To edit item details:
Refer to "Adding a New Item" or "Updating an Item".
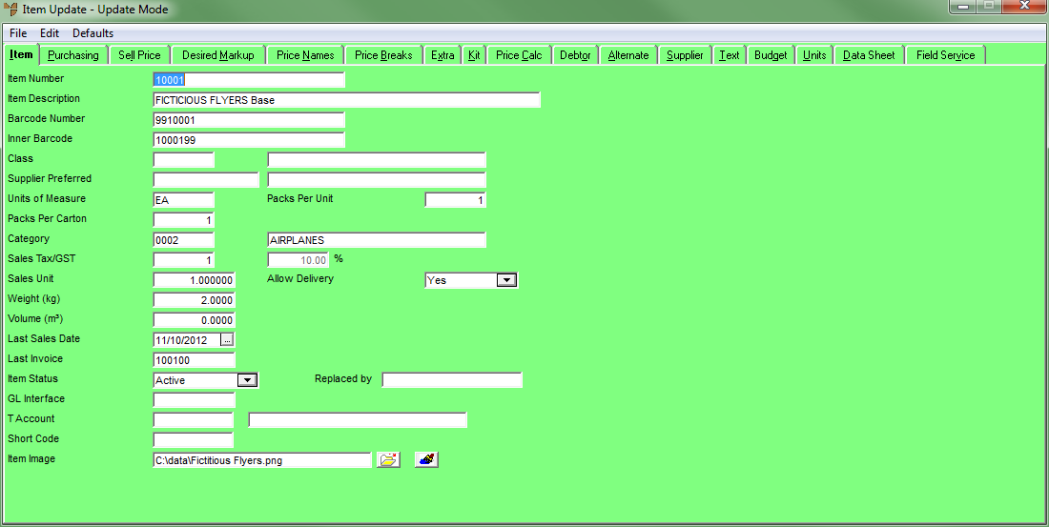
Micronet displays the Item Update screen - Item tab.
|
|
Field |
Value |
|---|---|---|
|
|
Item Number |
Micronet displays the item number for existing items. If you are creating a new item and Micronet has been set up to generate automatic item numbers, this field displays AUTO and the next available item number displays next to the Take Next Number button. Select the Take Next Number button to take the next number for this item. (Automatic item numbers are set in the Use Automatic Inventory Number field on the Inventory Configuration screen – see "Edit - Program - Inventory".) If Micronet is not set up for automatic item numbers, enter a unique number for the new item based on your company's item numbering conventions. Make sure there are no trailing spaces in the item number. If you are using MRF, you should enter:
Micronet looks for these default numbers when processing. You can have more than one waste or offcut item. |
|
|
Item Description |
Micronet displays the description for existing items. For new items, enter a description of up to 75 characters. This description is printed on invoices, picking slips and other relevant documents. Additional unlimited text can also be entered against an item on the Item Update screen - Text tab – see "File - Inventory - Text". |
|
|
|
Technical Tip There is a handy feature you can use when you want users to replace the current item with a different one. If you type the word "Use" at the start of the description followed by another item number, Micronet will replace the current item with the second one whenever a user enters the current item number. For example, if you change the description of item 50211 to "Use 53467", whenever a user enters 50211 when searching for an item, Micronet will replace it with item number 53467. |
|
|
|
Technical Tip If you want a master item in a colour/size table to also contain the colour and size details for sub-items, indicate how and where you want the details located in your description. The format options are:
For example, “Surfer T-Shirt \cd \sd” will result in “Surfer T-Shirt ColourDes SizeDes”. |
|
|
Barcode Number |
Micronet displays the primary barcode number for existing items. For new items, enter the primary barcode number or scan the barcode if connected to a PDA. 2.8 Feature You can enter different primary barcodes for different suppliers on the Item Update screen - Units tab – see "File - Inventory - Units (v2.8)". |
|
|
Unit Barcode 1, Inner Barcode, Unit Barcode 2 |
Multiple barcode numbers can be stored for each inventory item. For example, an item might be received in cartons containing 20 boxes each, with each of those smaller boxes contains 20 individual items. The larger box, smaller boxes within, and individual items might each have different barcodes. These fields are for entering those barcodes. You can also scan the appropriate barcode if connected to a PDA. |
|
|
Class |
This field gives you an alternative means of grouping items for reporting/inquiries. For example, a hardware store may have different classes of stock for hand tools, power tools, paint, etc. Classes are setup in the Class master file – see "File - Class". |
|
Supplier Preferred |
Enter the ID of the preferred supplier for this item.You can also press spacebar then Enter to select a supplier. You can store multiple alternate suppliers against the item – see "File - Inventory - Supplier". You can also have a different preferred supplier for the item for each warehouse – see "File - Inventory - Purchasing". (2.8 feature) |
|
|
Units of Measure |
Enter the unit in which the item is measured, e.g. EA (each), LM (lineal metres), SM or M2 (square metres), cartons, etc. These should already be defined in the Unit Recognition table – see "Edit Company - Edit - Unit Recognition (v2.7)" (v2.7) or "File - Unit File Update (v2.8)" (v2.8). If you are using MRF, you must enter LM for manufactured items and coils. Waste and offcut items (scrap) should be M2. Excess items can be LM or EA. |
|
|
Packs per Unit |
Enter the number of packs per unit in which the item may be sold. These values are displayed throughout Micronet. |
|
|
Packs per Carton |
If you want to be able to track stock in both packs and units per pack, enter the number of packs per carton. For example, a carton of beer might contain 24 cans. If you enter a number in this field, free stock will be displayed throughout Micronet in both cartons and packs. For example, a value of 20:08 would mean 20 cartons of beer and 8 individual bottles were in stock. |
|
|

|
Warning You cannot change the Packs per Carton figure while an item has stock on hand. To change this figure, you must first adjust the stock to 0.00 (zero stock on hand), then adjust the Packs Per Carton, then adjust the stock with the new quantity on hand. |
|
Category |
Enter the product category for this item. You can also press Tab or Enter to select a category. This provides an alternative means of grouping items for discounts, reports and inquiries. For more information, see "File - Product Category". If you are using the Micronet Kitting System (MKS) and this is a kitted item, you must select a Manufactured category. If you are using MRF, you must select a Diminishing category for normal store stock items, coil items and offcuts, a Roll Stock category for manufactured items (rolled or flashing), and a Non Diminishing category for waste items. |
|
|
Sales Tax/GST |
Enter the sales tax or GST percentage applicable to this item. The default is 10%. Alternatively, if you have set up tax tables, enter or select the appropriate table number for this item – see "Edit Company - Edit - Tax Tables". |
|
|
Sales Unit |
Enter the quantity in which the item is sold. This relates to the Units of Measure you entered above. For example, if the item is sold individually, you would enter 1. If it is sold in quantities of 100 (e.g. $3.00 per 100), you would enter 100. |
|
|
Allow Delivery |
Select whether partial deliveries of this item are allowed. Options are:
The last two options are used for items that are manufactured in batches (such as tiles) and where all the items in an order must come from the same batch, e.g. due to slight variations in colour between batches. |
|
|
Weight (kg) |
Enter the weight of the item in kilograms, if known. You can enter up to six decimal places. You must enter the item weight if you want Micronet to automatically calculate the weight of an order for freight purposes. |
|
|

|
Technical Tip You set Micronet to automatically calculate order weights by setting the Weight Calculation field on the Courier File Update screen to Add up Weights of Items – see "Couriers Master File". |
|
Volume (m3) |
Enter the volume of the item in cubic metres, if known. You can enter up to six decimal places. You must enter the item volume if you want Micronet to automatically calculate freight on sales orders based on volume. The Weight and Volume fields are made available to cater for import costing and/or notional costing. For more details on notional sales, refer to "Additional Order Entry Functions". |
|
|
Last Sales Date |
This is the last date a sale of the item was made. This is updated automatically each time a sale is made. |
|
|
Last Invoice |
This is the last invoice number relating to the item. This is updated automatically each time a sale is made. |
|
|
Item Status |
Select the item status. Options are:
A colour size master item is the template item that the actual colour/size combinations are created from. The item code and description are generated based on the format defined while all other fields - such as category, pricing details, etc. - are replicated from the colour/size master item. Note that each colour/size combination selected will create a unique individual part number within Micronet.
|
|
|
Replaced By |
If you selected Replacement in the previous field, enter or select the item that is replacing the selected item. |
|
|
GL Interface |
If you want to dissect stock/sales by item, enter the name of the GL interface record for this item. For more information on setting up GL interface records for the General Ledger, see "Setting up Micronet Integration". |
|
|
T Account |
If you are using T Accounts within MGL, assign the default details for this item. |
|
| Short Code |
2.8 Feature Some companies use short barcodes to identify and search for items. If your company uses short barcodes, enter the short barcode for this item. Users can search by this short barcode whenever the Item Selection screen is displayed for selecting items. |
|
| Item Image |
2.8 Feature If you want an image of the item displayed on item inquiry screens, enter the image path and filename, e.g. h:\Products\Images\Widget.jpg. Alternatively, you can select the folder button ( You can store your product images anywhere on the network, but preferably on the server. The images do not have to be stored within Micronet’s directory structure. However, the file drive path plus the image file name plus the image extension must not be greater than 49 characters. JPEG is the preferred image file type. Images should be no more than 256 colours and the image size should be a maximum of 350 pixels on the greatest dimension. Resizing of images, colour reduction and image file type changes should be done in imaging software such as Windows Paint, Paint Shop Pro or Adobe Photoshop before the image is imported to Micronet. If an image path and filename are already entered in this field, you can select the magnifier ( |
 ) to browse to the image file.
  ) to view the image.